Writing and deploying console application with Dart
If you are not really familiar with console applications development, but would like to write a console application then Dart may come really handy for you. Dart's simplicity and ease of learning make it an ideal choice for beginners looking to dive into console application development.
Recently I was trying to find a way to simplify my daily work and as I am using git in console many times throughout the day, I wanted to write some wrapper around it to combine different git commands for the sake of speed and convenience.
I am already familiar with Dart, as sometimes I develop mobile apps on Flutter, but if you didn't use Dart before it's quite easy to start.
We are going to write a command-line application, so these two dependencies are going to make things easier for us.
args: Parses raw command-line arguments into a set of options and values
cli_completion: Completion functionality for Dart Command-Line applications
dependencies:
  args: ^2.4.2
  cli_completion: ^0.3.0
Execution
The first class we are going to add is a Result class, every command we are going to execute can either return some data or error, in case it fails.
class Result {
  final String data;
  final String error;

  Result(this.data, this.error);

  bool isSuccess() {
    return error.isEmpty;
  }
}
Then we are going to need a function that would be responsible for executing our git console commands. We are going to create two, as in some cases it is easier to call a git command with arguments and in other cases executing a raw console command is much simpler.
Result exec(
  List<String> arguments, {
  bool printOutput = true,
}) {
  final result = Process.runSync(
    'git',
    arguments,
    runInShell: true,
  );

  final data = result.stdout;
  final error = result.stderr;

  if (printOutput) {
    stdout.write(data);
    stderr.write(error);

    print("");
  }

  return Result(data, error);
}

Result execRaw(
  String command, {
  bool printOutput = true,
}) {
  final result = Process.runSync(
    '/bin/sh',
    ["-c", command],
    runInShell: true,
  );

  final data = result.stdout;
  final error = result.stderr;

  if (printOutput) {
    stdout.write(data);
    stderr.write(error);

    print("");
  }

  return Result(data, error);
}
User interaction
There are some commands that would require a user confirmation, as they can be quite destructive, so we would need a function that waits for our input.
import 'dart:io';

bool requestConfirmation(String message) {
  print(message);

  return _isConfirmed(stdin.readLineSync());
}

bool _isConfirmed(String? response) {
  return response?.toLowerCase() == "y" || response?.toLowerCase() == "yes";
}
Commands
Okay, let's write our first command. Let's say we would like to display our last commit in a single line. First of all, we should extend base Command class from args package. Then, override name and description: name is the executable command name itself and description is used for displaying help.
In this simple command we just print a description and the execute the command git log --oneline -n 1.
class LastCommitCommand extends Command {
  @override
  final name = "last";
  @override
  final description = "Show the last commit from the current branch.";

  LastCommitCommand();

  @override
  void run() {
    print("Your last commit: ");

    exec(["log", "--oneline", "-n 1"]);
  }
}
Another command, instead of calling fetch and pull as two separate git commands, we can just execute our pull command, which will do everything for us at once.
import 'package:args/command_runner.dart';
import 'package:qq/executor.dart';

class PullCommand extends Command {
  @override
  final name = "pull";
  @override
  final description = "Fetch all the changes and pull withing one command.";

  PullCommand();

  @override
  void run() {
    exec(["fetch", "-p"]);
    exec(["pull"]);
  }
}
Instead of adding all the files after finishing the work, committing it and then pushing, we can do all of that with just one command.
In order to read the argument from the user input, we have to add option to argParser first and then read it in the run function.
import 'package:args/command_runner.dart';
import 'package:qq/executor.dart';

class PushCommand extends Command {
  @override
  final name = "push";
  @override
  final description =
      "Commit changes with the message and pushes to origin straight away.";

  PushCommand() {
    argParser.addOption('message', abbr: 'm');
  }

  @override
  void run() {
    final message = argResults?['message'];

    if (message == null || message.isEmpty) {
      return;
    }

    exec(["add", "--all"]);
    exec(["commit", "-m", message]);
    exec(["push", "origin", "HEAD"]);
  }
}
As for some more complex example, if we would like to add some changes to a commit you've already pushed.
Basically, we display last commit first, to make sure we are going to squash it into a right commit, commit with fixup, rebase and push force if needed.
import 'package:args/command_runner.dart';
import 'package:qq/executor.dart';
import 'package:qq/interact.dart';

class FixupCommand extends Command {
  @override
  final name = "fixup";
  @override
  final description = "Squash your changes into the latest commit";

  FixupCommand();

  @override
  void run() {
    print("You are on the branch: ");
    final currenctBranch = exec(["rev-parse", "--abbrev-ref", "HEAD"]);

    print("Your last commit: ");
    final lastCommit = exec(["log", "--oneline", "-n 1"]);
    final lastCommitHash = lastCommit.data.split(' ').first;

    exec(["add", "--all"]);
    exec(["commit", "--fixup=$lastCommitHash"], printOutput: false);
    execRaw(
        "GIT_SEQUENCE_EDITOR=: git rebase --interactive --autostash --autosquash \"HEAD^^\"");

    if (requestConfirmation(
        "Would you like to push force changes to the branch ${currenctBranch.data.trim()}?")) {
      exec(["push", "-f", "origin", "HEAD"]);
    }
  }
}
Subcommands
We can have one command and many subcommands connected to it. To implement it we should add a Subcommand in the constructor of a Command.
import 'package:args/command_runner.dart';
import 'package:qq/commands/subcommands/branch/remove_branch.dart';

class BranchCommand extends Command {
  @override
  final name = "branch";
  @override
  final description = "Performs operations with your branches.";

  BranchCommand() {
    addSubcommand(RemoveBranchCommand());
  }
}
In the example here, we have branch command and rm subcommand with different flags/arguments. To remove all local branches we should execute qq branch rm -l or qq branch rm -s to remove all the branches except dev/develop or main/master .
import 'dart:io';

import 'package:args/command_runner.dart';
import 'package:qq/executor.dart';
import 'package:qq/interact.dart';

class RemoveBranchCommand extends Command {
  @override
  final name = "rm";
  @override
  final description = "Remove all local branches except current one.";

  RemoveBranchCommand() {
    argParser.addFlag('local', abbr: 'l');
    argParser.addFlag(
      'secondary',
      abbr: 's',
      help: "Remove all local branches except main(master) and develop(dev).",
    );
  }

  @override
  void run() {
    bool removeLocal = argResults?['local'];
    bool removeOnlySecondary = argResults?['secondary'];

    if (removeLocal) {
      if (removeOnlySecondary) {
        _removeSecondaryLocalBranches();
      } else {
        _removeAllLocalBranches();
      }
    }
  }
}

void _removeAllLocalBranches() {
  if (requestConfirmation(
    "Are you sure you would like to remove all your local branches except current one? (y/n)",
  )) {
    final result = execRaw("git branch | grep -v \"^*\" | xargs git branch -D");

    if (result.isSuccess()) {
      stdout.writeln('Done!');
    }
  }
}

void _removeSecondaryLocalBranches() {
  if (requestConfirmation(
    "Are you sure you would like to remove all your local branches except current and main/master and develop/dev? (y/n)",
  )) {
    final result = execRaw(
        "git branch | grep -v \"develop\" | grep -v \"dev\" | grep -v \"main\" | grep -v \"master\" | grep -v \"^*\" | xargs git branch -D");

    if (result.isSuccess()) {
      stdout.writeln('Done!');
    }
  }
}
Main
Finally, we need to combine all the commands and subcommands, and wrap them with a CompletionCommandRunner to enable command completion functionality when you press Tab in your terminal.
import 'package:args/command_runner.dart';
import 'package:cli_completion/cli_completion.dart';
import 'package:qq/commands/branch.dart';
import 'package:qq/commands/fixup.dart';
import 'package:qq/commands/last_commit.dart';
import 'package:qq/commands/pull.dart';
import 'package:qq/commands/push.dart';
import 'package:qq/commands/uncommit.dart';
import 'package:qq/executor.dart';
void main(List<String> arguments) {
CompletionRunner(
"qq",
"Addition set of git commands to simplify daily routine",
)
..addCommand(BranchCommand())
..addCommand(LastCommitCommand())
..addCommand(PushCommand())
..addCommand(UncommitCommand())
..addCommand(FixupCommand())
..addCommand(PullCommand())
..run(arguments).catchError((error) {
if (error is! UsageException) throw error;
print("Command not found, fallback to git.");
exec(arguments);
});
}
class CompletionRunner extends CompletionCommandRunner {
CompletionRunner(super.executableName, super.description);
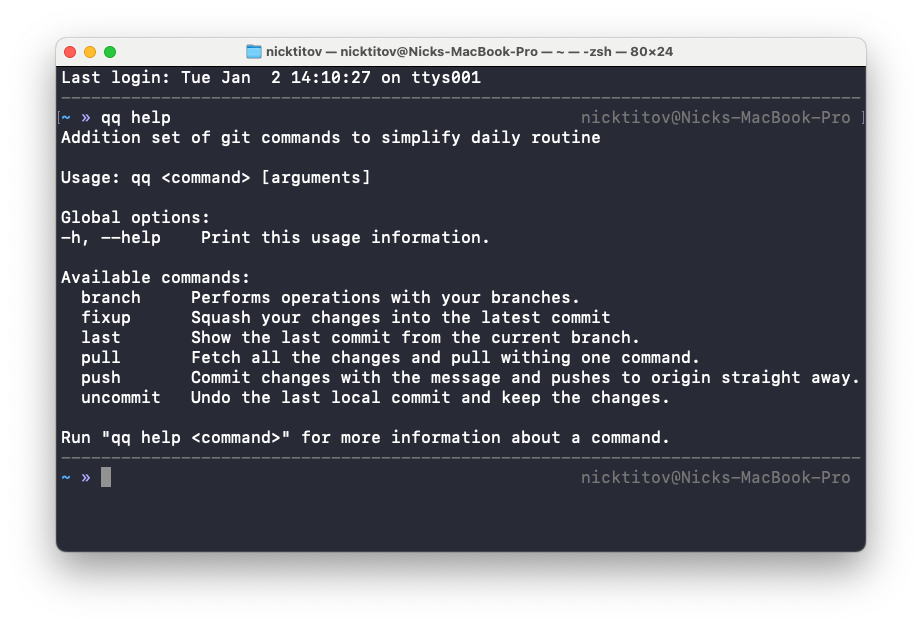
}We also get the help command out of the box, which is really convenient, as it can be difficult to remember all the commands and subcommands, especially if you have many.
Compile
To use it as executable, we have to compile it first, the easiest way is to compile it to an .exe executable which is supported by most platforms.
The exe subcommand produces a standalone executable for Windows, macOS, or Linux. A standalone executable is native machine code that's compiled from the specified Dart file and its dependencies, plus a small Dart runtime that handles type checking and garbage collection.
We can distribute and run the output file like we would any other executable file.
$ dart compile exe bin/myapp.dart -o /tmp/myapp$ ./tmp/myappTo be able to run it from anywhere in you terminal, we have to export the path globally. Lets export it on macOS, as an example. Depending on the type of our terminal, we should edit either /Users/$USER/.bash_profile or /Users/$USER/.zshrc file.
We should add
export PATH=".:/tmp/myapp.exe:$PATH"
or
export PATH=".:$PATH:/tmp/myapp.exe"
to the file.
Once we have saved the dot file, we can invoke the PATH changes as follows for the relevant shell:
source ~/.bash_profile
source ~/.zshrc
Now we should be able to run our commands from the terminal, for example:
qq help or qq pull.
Thanks for reading!
If you are interested, please check the full repository here.